Scripting with SQL
SQL language
In OrbisGIS, you can process data using the Spatial SQL langage. To do so, you have to execute your instructions into the SQL Console.
Here, all Spatial SQL functions and operators are based on the H2GIS RDBMS* and are mostly following the OGC Simple Feature Access - SQL standard.
* Remarks:
- Only if you started OrbisGIS in H2GIS (local or remote) mode (see Configure).
- In this configuration, the “non-spatial” SQL functions and operators are executed by the H2 Database Engine. Consult its quite complete documentation if you have any question about SQL.
SQL Console
The SQL console (  ) is the place where the user can execute SQL scripts. This component is available through the “Tools” menu.
Note that:
- You can open as many Console you want,
- The content of your Console can be automaticaly saved when you close OrbisGIS.
Here, the user is able to:
- Write & execute (
 ) instructions,
 - Execute only selected instructions (
 ),
), - Load & Save .sql files,
- Search (spatial) SQL functions and operators into a predetermined list (
 ) (the full list is available here),
 - To drag & drop a function from the list to the text area, in order to see the default syntax of the chosen function,
- Search & Replace words (with advanced options) (
 ),
), - Share SQL instructions via email (need the “Mailto” plugin),
- Specify a query timeout (
 ),
), - To auto-complete instructions (see Auto-completion ).
Remarks:
- You are able to open as many console you want,
- The content of the console is saved by default,
- There is syntax coloration that helps the user to read the instructions,
- You also have some additional functionalities thanks to a right-click in the text area.
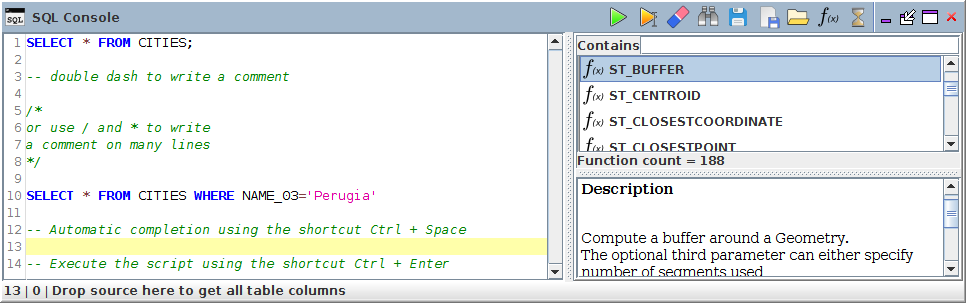
Below are some other tooltips:
1 2 3 4 5 6 7 8 9 10 11 12 13 14 | SELECT * FROM CITIES;
-- double dash to write a comment
/*
or use / and * to write
a comment on many lines
*/
SELECT * FROM CITIES WHERE NAME='Perugia';
-- Automatic completion using the shortcut Ctrl + Space
-- Execute the script using the shortcut Ctrl + Enter
|
Auto-completion
To use the auto-completion, just press “Ctrl + Space”. For example, if you write “sel” and then press “Ctrl + Space”, OrbisGIS will recognize that you want to write “SELECT”. In the same spirit, if you start writing the name of a function, a table or field, a dropdown list will appear on the right to offer you the corresponding elements.
Below is an illustration video (made for the V3.0 but works in the same spirit in the last version of OrbisGIS).
Use cases
Below are some use cases to illustate the power of Spatial SQL in OrbisGIS.
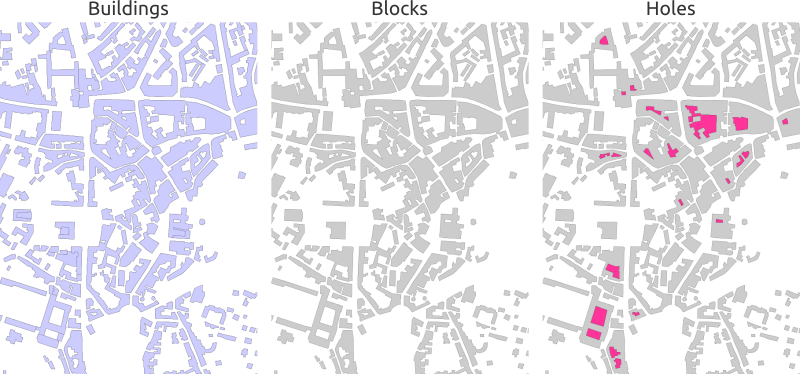
Detect holes into geometries
Here, we want to detect interior holes in a group of buildings (called block).
- Method :
- Merge buildings
- Explode multi-geometries
- Produce holes and keep only polygon information
SQL instructions:
1 2 3 4 5 6 7 8 9 10 11 12 13 14 15 16 17 18 19 20 21 | DROP TABLE IF EXISTS BLOCK , BLOCK_EXPL, HOLES, BLOCK_HOLES ;
-- All buildings are merge into one, if there are 1cm far from the others
CREATE TABLE BLOCK AS
SELECT ST_UNION(ST_ACCUM(ST_BUFFER(THE_GEOM ,0.01))) as THE_GEOM
FROM BUILDINGS;
-- We explode this table in order to convert multipolygons into simple polygons
CREATE TABLE BLOCK_EXPL AS SELECT * FROM ST_EXPLODE ('BLOCK') ;
-- We remove the table BLOCK and we rename BLOCK_EXPL to be more clear
DROP TABLE BLOCK;
ALTER TABLE BLOCK_EXPL RENAME TO BLOCK ;
-- We add the "PK_BLOCK" id, which will be a primary key
ALTER TABLE BLOCK ADD COLUMN PK_BLOCK serial ;
CREATE PRIMARY KEY ON BLOCK(PK_BLOCK);
CREATE SPATIAL INDEX ON BLOCK(THE_GEOM);
-- We creates holes and we keep only surfacic geometries (dimension = 2)
DROP TABLE IF EXISTS HOLES, BLOCK_HOLES ;
CREATE TABLE HOLES AS SELECT ST_HOLES(THE_GEOM) as THE_GEOM, PK_BLOCK FROM BLOCK;
CREATE TABLE BLOCK_HOLES AS SELECT * FROM HOLES WHERE ST_DIMENSION(THE_GEOM)=2;
|
Result:
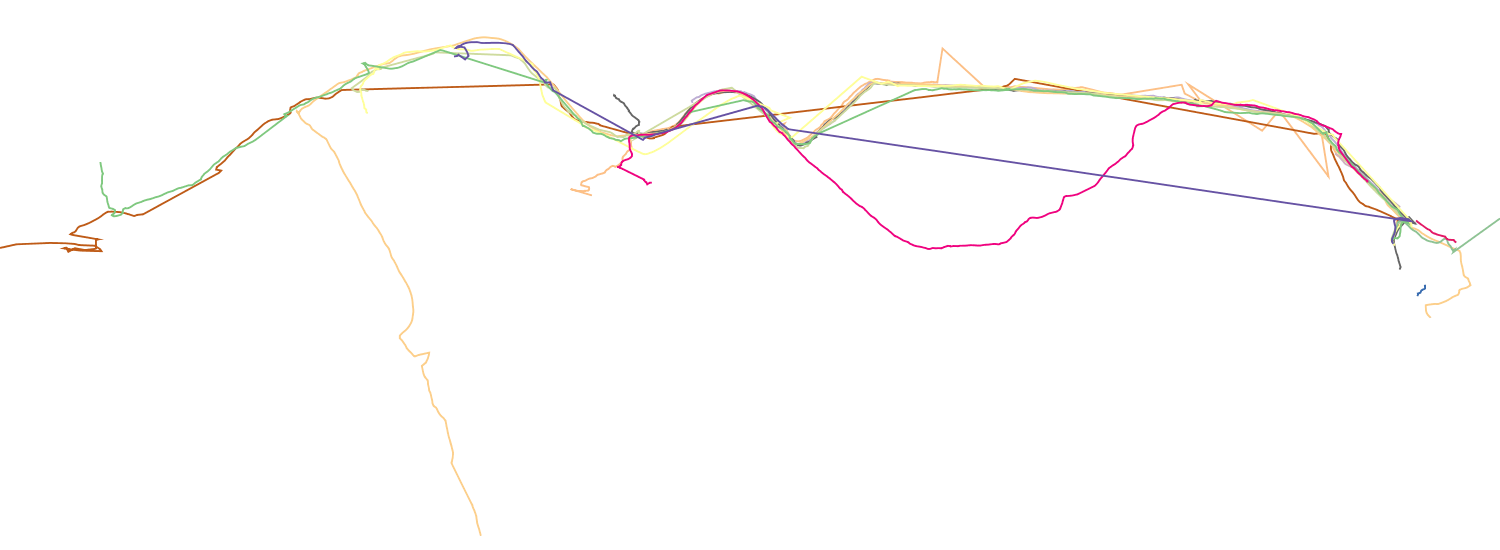
Spatialize GPS data
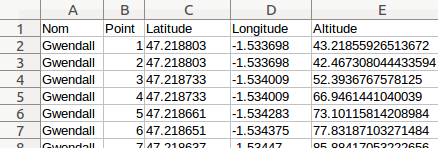
From a .csv file (see screenshot below), that contains GPS tracks of different peoples, recreate tracks and visualize the result in a map.
SQL instructions:
1 2 3 4 5 6 7 8 9 10 11 12 13 14 15 16 17 18 | -- 1. Import .csv file into a table called MY_GPS_POINTS
DROP TABLE IF EXISTS MY_GPS_POINTS;
CREATE TABLE MY_GPS_POINTS AS SELECT *
FROM CSVRead('/my_url/gps_tracks.csv');
-- 2. Convert this table into a point layer (keeping all possible attributes)
DROP TABLE IF EXISTS MY_POINTS;
CREATE TABLE MY_POINTS AS
SELECT ST_MAKEPOINT(LONGITUDE,LATITUDE) as THE_GEOM, NAME, POINT, ALTITUDE
FROM MY_GPS_POINTS;
-- 3. Update Z value of points, using the Altitude field
UPDATE MY_POINTS SET THE_GEOM=ST_UPDATEZ(THE_GEOM, ALTITUDE);
-- 4. Generate a new layer with the different tracks stored as lines (one per people)
DROP TABLE IF EXISTS LINES;
CREATE TABLE LINES AS SELECT ST_MAKELINE(ST_ACCUM(THE_GEOM)) as THE_GEOM, NAME
FROM MY_POINTS GROUP BY NAME;
|
Result: