Plugins
OrbisGIS can be extended with new features thanks to its Plugins manager.
By default, some plugins are already installed (e.g Systems plugins, …). In addition, user can optionnaly add some Official plugins.
OSGi specification
Here, plugins are following the OSGi specification (release n°4.3). This systems allows developers to deploy their plugins in a simple and normalized way and to entrust the management of dependancies to OSGi.
To know more about this system, please consult the following documentation: OrbisGIS plugin system.
Plugins manager
To install a plugin, you have to launch the “Plugin manager” which is in the “Tools” menu of OrbisGIS.
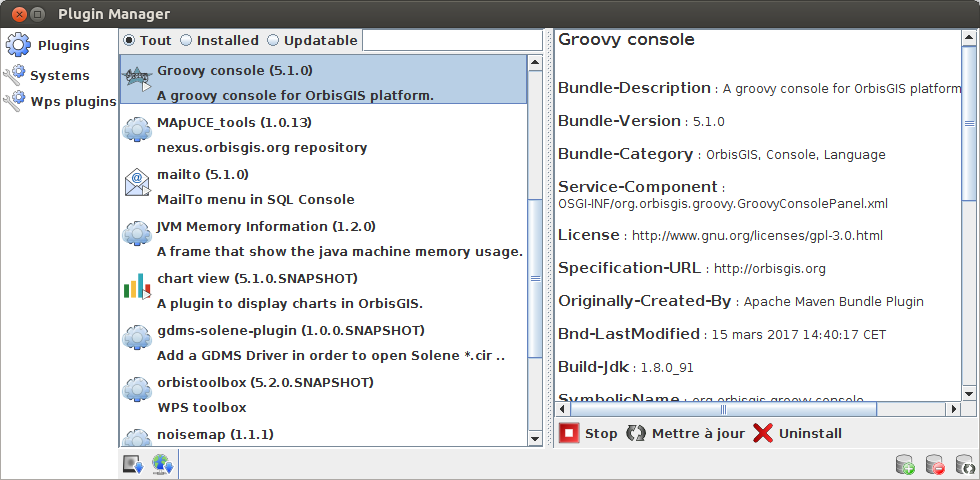
Here, users can:
- Search plugins thanks to the engine,
- Filter all, installed or updatable plugins,
- Choose the type of plugins:
- Plugins: mainly dedicated to users,
- Systems: mainly dedicated to developers,
- WPS plugins: plugins following the OGC WPS standard and available in the “Toolbox”.
- Add a plugin*
- from the disk (
 ): select an OSGI jar file,
 - from an url (
 ): specify an url.
- from the disk (
- Add (
 ) / remove (
  ) / update (
  ) a remote bundle repository,
 - Download/start/stop/update/uninstall a plugin.
* in both cases, dependancies will not be automatically resolved.
When selecting a plugin, users can:
- Download (
 ) the plugin,
 - Download and start (
 ) the plugin,
 - Stop (
 ) the plugin,
 - Refresh (
 ) the plugin,
 - Uninstall (
 ) the plugin.
Official plugins
The following plugins are developed by the OrbisGIS team but are not deployed by default. To install them, just use the Plugins manager.
Those plugins are documented in their dedicated GitHub repository. Here, you can find:
- ChartView
- Groovy Console (see also Scripting with Groovy)
- Mailto
- Map Composer
- JVM memory
- R Console (see also Scripting with R)
… and probably more to come !